
For Agents
8 min read
How to Create Company-Wide CMA Templates with Relab’s Default CMA Template
Creating consistent CMA templates across your organisation helps maintain a professional brand image and saves your agents valuable time. As a marketing or brand manager, you'll learn how to design, save and distribute CMA templates that reflect your company's unique style and standards.
This guide walks you through the practical steps of creating and customising templates using Relab's default options so your entire team can use them.
Creating company-wide CMA templates streamlines your brand presentation and saves valuable time for your entire team. By following the process outlined in this guide, you've learned how to design, save, and distribute professional CMA templates that maintain your brand identity.
For easy reference, here's a condensed checklist of the key steps:
With these steps, you can ensure brand consistency while giving your agents the professional tools they need to succeed in their listing presentations.
This guide walks you through the practical steps of creating and customising templates using Relab's default options so your entire team can use them.
- Getting Started with Relab’s CMA Design Studio
- To edit the template of your CMA you will need to start a CMA on a specific property
- Select "Next step" then you will directed to CMA design studio
- From here you can edit and save your new appraisal template for all future CMAs
- Your company's brand guidelines handy
- Logos or images you want to include
- Have a Relab Team Plan (not an individual subscription) and appropriate admin permissions
- Customising Your CMA Template
- Once in the CMA Design Studio, you can start editing the Relab default template directly
- Make changes to the design, layout, and content to match your brand guidelines
- Add your company logo to maintain brand identity
- Apply your brand colours, headings, backgrounds, and accent elements
- Select fonts that match your company's visual identity by choosing font colour, spacing and size
- Saving and Setting Permissions
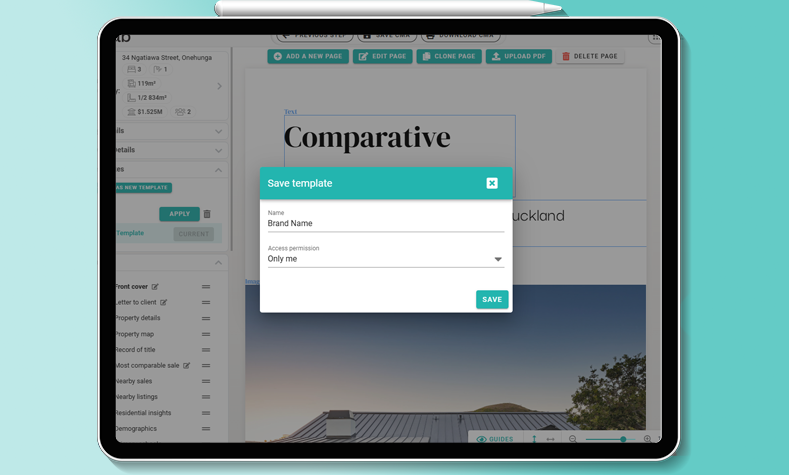
- Once you've completed your design changes, look for the "+ SAVE AS NEW TEMPLATE" button in the left sidebar. Click this button to open the save options
- Give your template a descriptive name that clearly identifies it as the company standard
- After naming your template, you'll see “Access Permission” dropdown menu
- Select "My Branch" This makes the template available to everyone in your branch
- Click "Save" to finalise your template
- Your agents will see this template when they create new CMAs
- The new template will now be available to all users with the appropriate access
- They can use it as their starting point, ensuring brand consistency while allowing customisation for specific listings
- The "My Branch" permission setting is crucial for ensuring your template becomes the standard for your entire team.
Let's start with how to access and use the CMA Design Studio with Relab to create templates that work for your whole team.
Before You Begin
Make sure you have:
The CMA Design Studio gives you a canvas to work with, similar to other design tools you might have used. Take a moment to familiarise yourself with the layout and options available.
Now that you're in the CMA Design Studio, you can begin customising your template to align with your company's brand standards. This is where you'll create the professional look that all agents will use.
Working with Available Editing Features
Keep in mind that with the Relab default CMA template, you'll have partial branding capabilities. You can customise the appearance of cover pages and welcome content, but won't have full control over data pages (comps, maps, etc.) or headers/footers on all pages.
If you wish to have more brand control please check out our bespoke CMA enterprise plans.
Editing the Template and Brand Elements
After customising your template, you need to save it properly and set the correct permissions to make it available to your team.
Saving Your Template
Note: All users, including yourself, can only save 'copies' of templates
Setting the Correct Access Permissions
If you're updating an existing template, remember to delete the old template copy after creating the new one
Making Templates Available
Conclusion
Creating company-wide CMA templates streamlines your brand presentation and saves valuable time for your entire team. By following the process outlined in this guide, you've learned how to design, save, and distribute professional CMA templates that maintain your brand identity.
Quick Reference: Step-by-Step Process
For easy reference, here's a condensed checklist of the key steps:
- Access the CMA by clicking the grid button in the upper right
- Click "Next Step" to enter the CMA design studio
- Customise the template with your brand elements and preferred layout
- Click "+ SAVE AS NEW TEMPLATE" in the left sidebar
- Name your template clearly and select "My Branch" for Access Permission
- Click "Save" to make it available to your team
- Communicate with team leads about the new template
With these steps, you can ensure brand consistency while giving your agents the professional tools they need to succeed in their listing presentations.